Uncategorised

Lentil Soup

Today I decided to find a use for the bag of lentils I’ve had in my cupboard for about six months. I’m not a very confident cook, so I thought soup would be the easiest thing to do. It turned out really well, so well in fact that there are no photos in existence as it disappeared too quickly! Here’s the recipe if anyone wants to try.

Lentil Soup (serves 4)

175g red lentils
3 small onions
4 medium sized potatoes
5 or 6 average sized carrots
Vegetable stock cube

Put the lentils in a pan of water and boil for about 10 minutes. Reduce the heat and simmer for another 5 minutes. Dissolve the stock cube in 3/4 pint of boiling water, and add to the lentils. Peel and chop the onions, potatoes and carrots, and add to the pan. Simmer gently until the total cooking time is about an hour, or until all the vegetables are soft. Take the pan off the heat and blend the soup until smooth. Serve with warm crusty bread.

Uncategorised

Yummy crusty bread

I’ve always wanted to be more self-sufficient, but I’ve been too lazy/tired/busy to actually do anything about it. Well, today I took advantage of a child-free day and made some bread. I’m so proud of it – two lovely white crusty loaves. I just ate a few slices with butter and jam, and it’s so good! Think I’ll have to start getting up earlier and baking my own bread, the shop stuff just can’t compete with a good home-made loaf.

Uncategorised

Handbag Tutorial

I designed and made a handbag this evening, as a gift for my mother-in-law’s birthday. I’ve decided to write up a tutorial of how I did it, as I really like the design and will probably experiment and make more in the future.

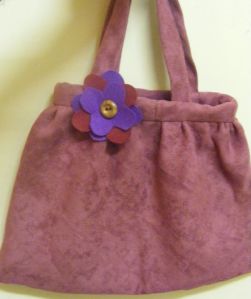
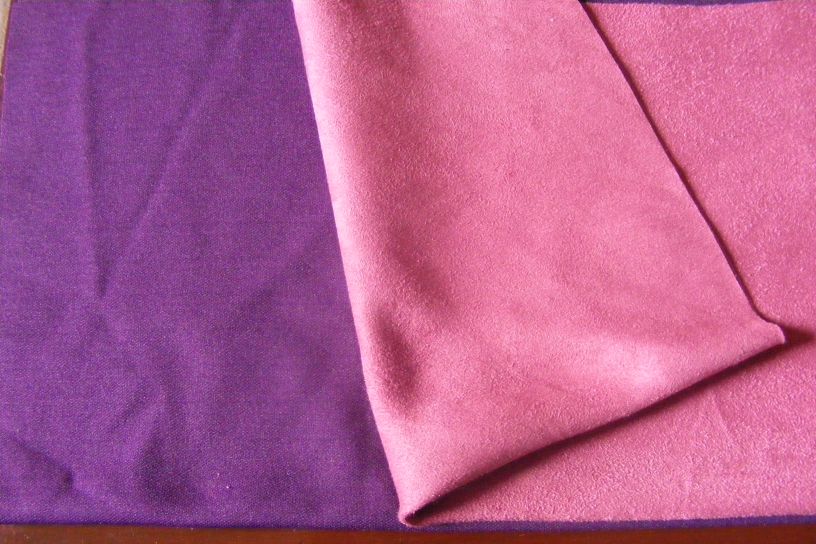
The bag is made of dusky pink suede, salvaged from a second-hand skirt. I lined it with deep purple fabric, and finished it with a felt flower and a wooden button. It measures approximately 12 inches wide by 9 inches high, although it could be made in a variety of sizes. I had a few issues with the cutting out, as the skirt I used had been cut on the bias, making it difficult to get a straight bit of fabric. I’m not the world’s best sewer, and a lot of this was trial and error, so there are probably better ways to achieve the finished result. However, the whole thing took about 4 1/2 hours to make, so quite a quick and easy project.

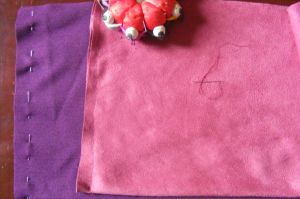
To make the bag, cut out two large rectangles of fabric, one in the main fabric, and one in the lining. Cut these rectangles on the fold, so that there doesn’t need to be a seam at the bottom of the bag.

Next, sew the side seams on both pieces using a backstitch. Trim the seams and press them flat to produce a neater effect.

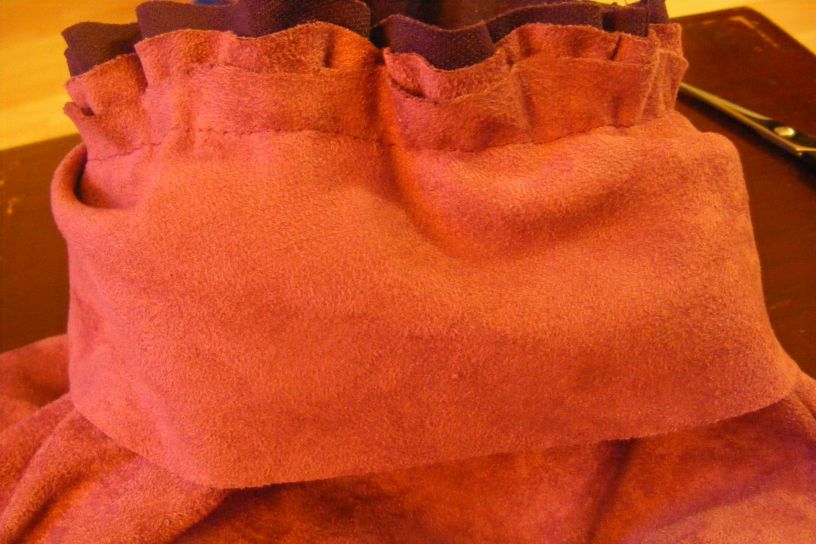
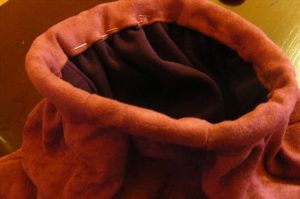
Turn the main bag piece right side out, and place the lining piece inside, so that the wrong sides are touching. Line up the corners and seams, and then pin the two pieces together around the top of the bag opening. Using a double thread for extra security, gather round the top of the opening with a running stitch. The aim is to draw in the top of the bag just enough to create the desired effect, while still leaving a sizeable top opening. Secure the gathering thread and spread out the finished gathers evenly.

Next, cut a piece of the main fabric to use as a binding for the top of the bag. This should be long enough to go round the opening, and wide enough to edge the top of the bag for about 3/4 of an inch on both the right and wrong sides. Pin the binding in place round the top of the bag with the right sides touching, making sure that the gathering thread is covered. Seam the two ends of the binding before attaching them to the opening of the bag, so that a neat seam will be seen on the right side. Sew the binding in place with a firm backstitch.

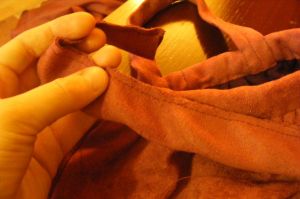
Turn the binding to the right side, fold over a hem, and then pin the hemmed edge to the inside of the bag. Make sure that both sides of the binding are an equal depth. Sew the second side of the binding in place – I used a tiny whip stitch for this.

Your bag should now look like this – in my picture the pins are still showing, but you get the idea!

The next step is to make the handles. Cut two long strips of fabric, about 2 to 3 inches wide. Fold in half lengthways with the right sides together, and sew a seam with backstitch. Turn the handle right side out, using a knitting needle or something similar to help if necessary. Fold the raw edges inside the handle at each end, and then attach the ends to the inside of the bag. I used a whip stitch for this bit. Although I handsewed everything, you could probably sew this quite neatly on a machine, perhaps oversewing decoratively with a contrasting thread. You can see the different stages of the handles in this picture – I’m holding one handle before it’s turned the right way out, and the other handle has already been attached.

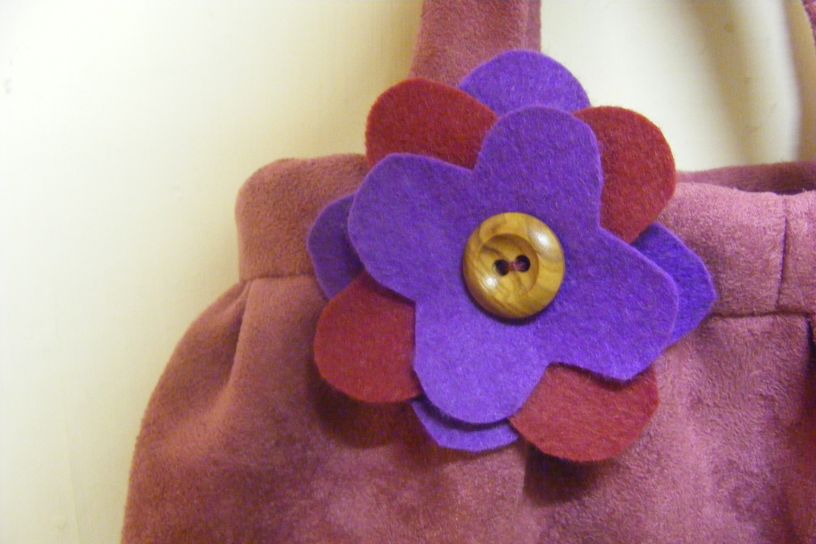
The final stage is to decorate your bag. I used a felt flower with a wooden button at the centre, and sewed it near the top of the bag. You could also add sequins, applique, flowers, buttons, ribbons – anything that suits you and your taste.

Uncategorised

The smell of fresh baking…

Here are the scones I baked this evening, to use up some flour and margarine I had left. They smell amazing, and look so yummy that I don’t know if they’ll last the night!

The recipe is really simple, adapted from Delia Smith, and here it is if anyone wants to try it. These quantities make 6 scones, but you can double it if you have a bigger family than I do.

4oz self-raising flour
3/4 oz margarine

Sift the flour and rub in the margarine until it resembles breadcrumbs. Add a large teaspoon of caster sugar, and mix in milk to make a smooth dough. Roll out the dough on a floured surface until it’s about 2cm thick, and then cut rounds. Brush the tops with milk to make them golden, and bake on Gas Mark 7 for 15 minutes (ish). Enjoy!

Uncategorised

Felt Applique Book

UFOs. Unfinished Objects. The bane of my life! I’ve spent the past year steadily working through my knitting UFOs, and have managed to get things down to just two projects on the go at any one time – one that I work on, and one that I need to finish but can’t be bothered with. Now it’s time to start on the sewing and embroidery projects.

I started to make a felt applique alphabet book when I was about 16, inspired by a 70s/80s American craft book belonging to my mum. I started to cut out and sew some of the pieces, then it all went into a box until I got pregnant with my first child four years later. I thought pregnancy would be the perfect opportunity to finish the project, especially as I was confined to a sofa for most of the last few months. Off I went to the nearest haberdashers, bought the remaining felt that I needed, and cut out all the pieces. This time I managed to sew all the pages up until the letter “K”. Then the reality of life with a new baby kicked in, and the applique book disappeared along with all my spare time.

I’m now determined to finish the book before the end of this pregnancy, which gives me a deadline of about nine and a half weeks. Here are a few photos of some of the pages I’ve done so far.

A is for Apple. The ladybird is velcroed on the back so it can be stuck on the apple in different places.

B is for Butterfly. This one isn’t quite finished yet. The pompoms will be attached to pieces of yarn to form antennae, and can be threaded through the holes in the wings.

C is for Clown. He’s a bit freaky actually, and clowns don’t usually scare me! Apologies for the awful quality of the picture, I need to learn how to take good photos.

And finally (for the moment), D is for Dinosaur. His jaw is hinged with a button, so he can snap his sharp teeth. He’s a friendly dinosaur though – he carries a daisy as he skips through the meadow.

I’ll post some more pictures of my progress soon – hopefully in better light!