Uncategorised

Heydays

A couple of years ago, I made myself corduroy dungarees from this Kwik Sew pattern. They were comfortable, warm, and seemed to nicely fill the dungaree shaped hole in my wardrobe. At the start of this year, I noticed lots of people online wearing dungarees made from duvet covers. They looked amazing, but I told myself that one pair of dungarees was quite enough. Then my friend got in touch with me, and told me that I needed to have the Heyday Dungaree pattern from Made by Jack’s Mum in my life. I was dubious, if I’m honest. How many dungarees does one person need? And did I really need to buy another pattern? I thought about it for quite a while, and kept looking at the Heydays on Instagram. The more I looked at them, the more I noticed the comfortable fit, the large number of pockets, and the multitude of different fabrics used to make them. Then, in a moment of weakness, I went on Etsy and bought the pattern.

Five pairs of dungarees later, I’m a Heyday convert! I absolutely love this pattern. It has a super comfy relaxed fit, meaning that you can wear a sweater underneath it and sit down without worrying about splitting any seams. The size range is good, covering sizes XXS to 5XL. The legs have a wide turn up at the bottom, there are five large pockets, and the straps are tied onto simple button loops. I measured in between a size M and L, and went for an L as I didn’t want them to feel restrictive. My first pair were sewn up in some denim chambray from Abakhan which had been sitting in my stash for a few years. It’s a beautifully soft fabric, but unfortunately it just wasn’t suited to this kind of garment. I noticed that it seemed a bit stretched when I was sewing it together, and it frayed very easily. After wearing the dungarees for half an hour or so, the seams started to show signs of wear and tear. I’ll be able to get some use out of them as long as I don’t have to crawl about on the floor or do anything too strenuous. I’m wearing them here with a llama print t-shirt that I sewed myself with some lovely thick cotton jersey from Pound Fabrics.

Because these dungarees weren’t the success I’d hoped they would be, I soon started thinking about my next pair. I hadn’t needed to adjust the first pair at all, even though they’re drafted to fit someone three inches shorter than me. However, if you’re over 5’8″ ish, I’d suggest you add a few inches to the leg to create decent turn ups. I have wee short legs, so didn’t feel I needed the extra. Lots of people online had been cutting up duvet covers to make their dungarees, and I managed to bag myself a particularly popular one from Asda. I really liked the colours and the bold flower pattern. The fabric was a bit thin, but they work very well for summer. I tried and failed to pattern match. I’ve teamed these ones with a homemade t-shirt in grey marled jersey, again from Pound Fabrics. I have wondered if anyone will ever stop me in the supermarket and tell me that my outfit looks very familiar, but it hasn’t happened yet.

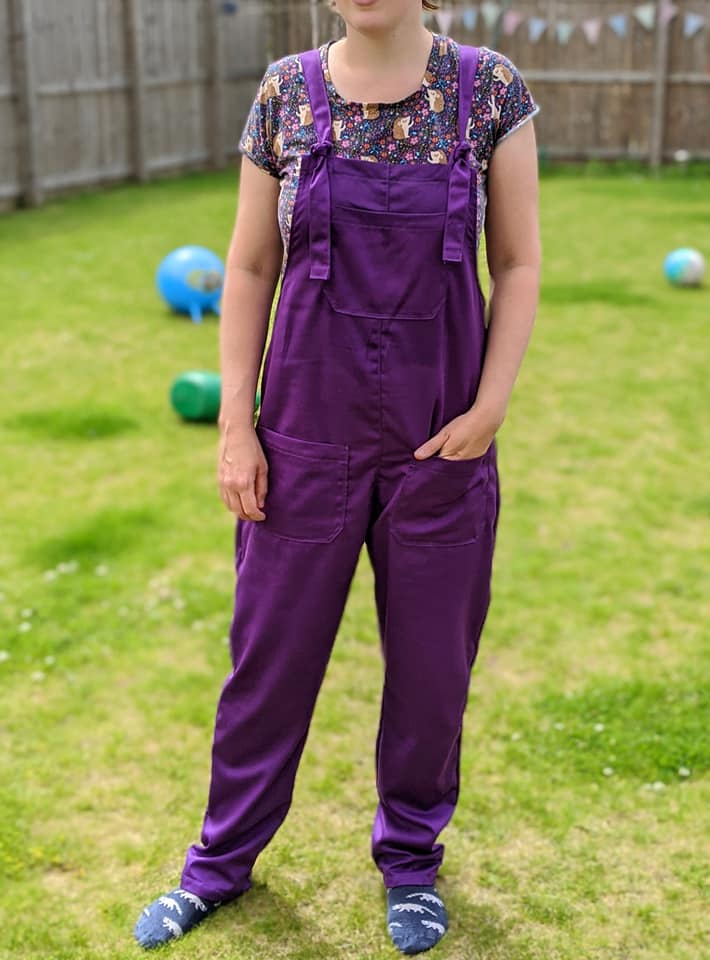
After these two pairs I took a little break, convinced that there was no way I needed any more dungarees at all. Then I reminded myself how practical they were. The big deep pockets hold all the various treasures that my two year old gives me over the course of a day. I can pull the bib to one side and feed my baby and no one ever notices. And of course I couldn’t really wear the chambray pair, so I needed to replace them. So my third pair of Heydays became my all time favourites.

These ones were made in a purple polyester and cotton mix fabric described as “scrubs material”. The colour is vibrant, a kind of Cadbury’s chocolate bar shade. I got it from Croft Mill, although it’s sadly out of stock now. These dungarees quickly became my firm favourites. The fabric is soft and flexible enough to be really comfortable, but it’s also super durable. I wear them every single week and I love them. I’ve teamed them here with a homemade t-shirt in a hedgehog print jersey from Clarabelle Fabrics.

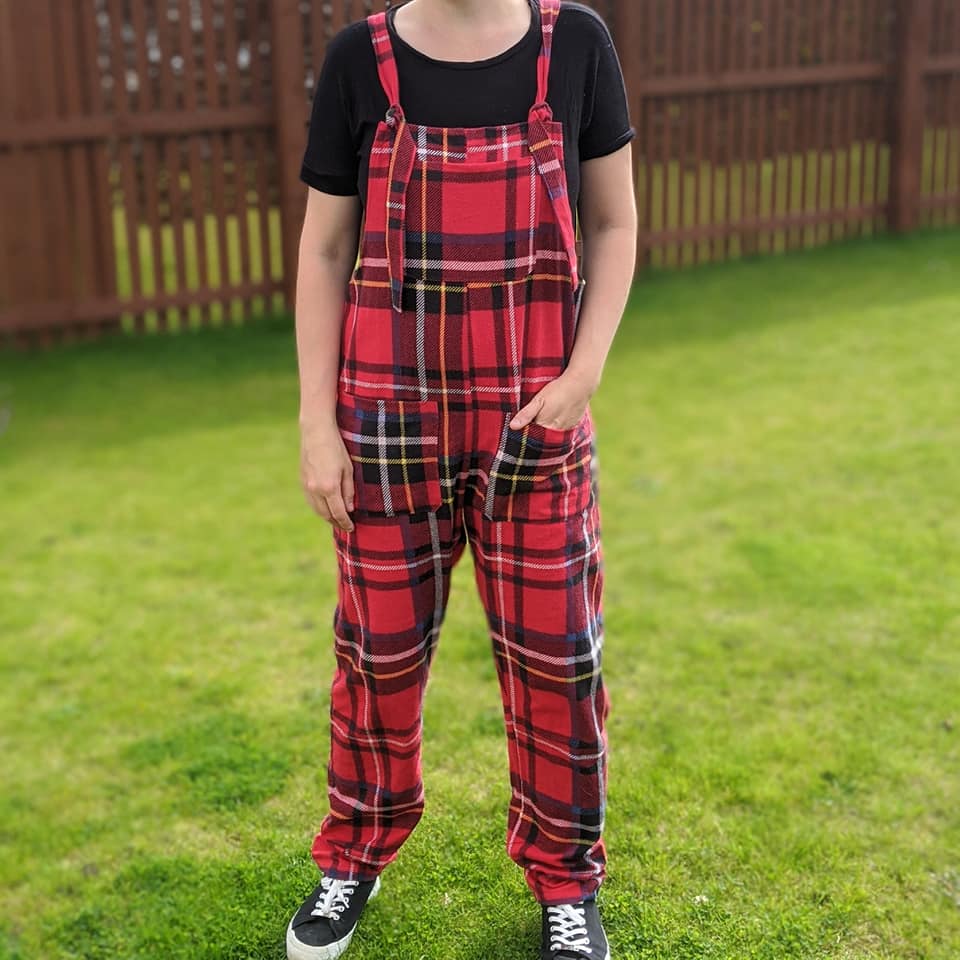
After this, social media was a bad influence. Someone posted about her latest make on the Made by Jack’s Mum Facebook group – blue tartan brushed cotton dungarees using an old duvet cover. As soon as I saw them, I remembered that I had a red tartan king size duvet cover loitering in my cupboard. I’d bought it from a charity shop for £3 (I think) with some vague ideas of what I wanted to do with it, and it had sat in a box ever since. I dug out the Heydays pattern, cut out the pieces, and the next night I spent 2 hours sewing and finished another outfit. King size duvet covers have a ridiculous amount of fabric, so I still have loads left. Turns out brushed cotton is so warm and snuggly when sewn into what is basically an adult sized sleepsuit!

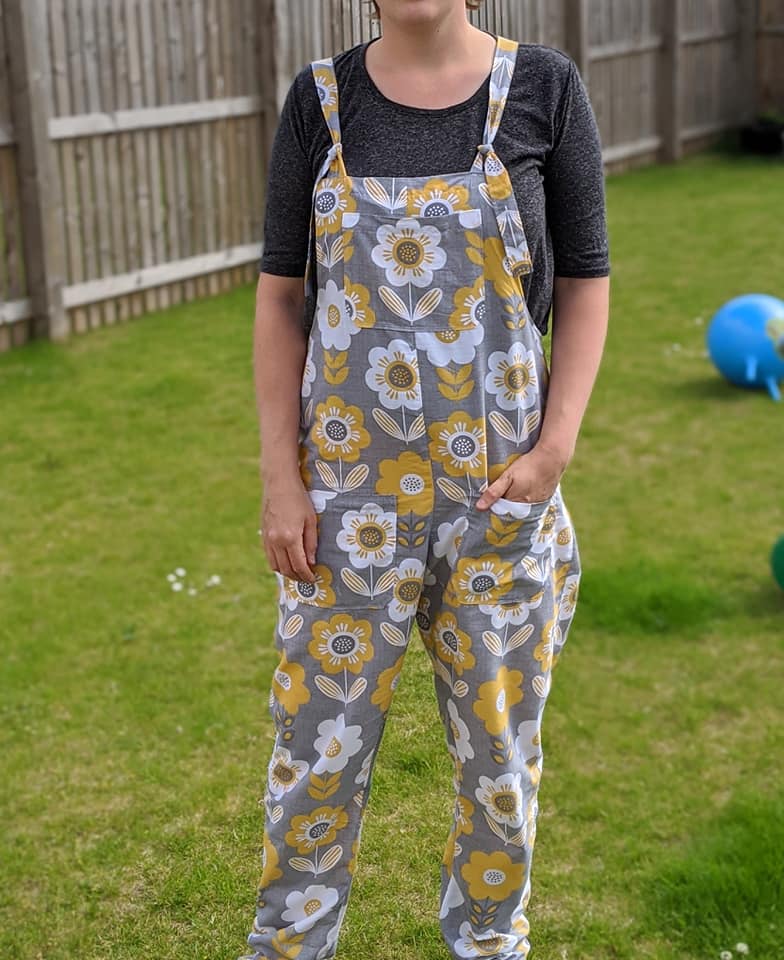
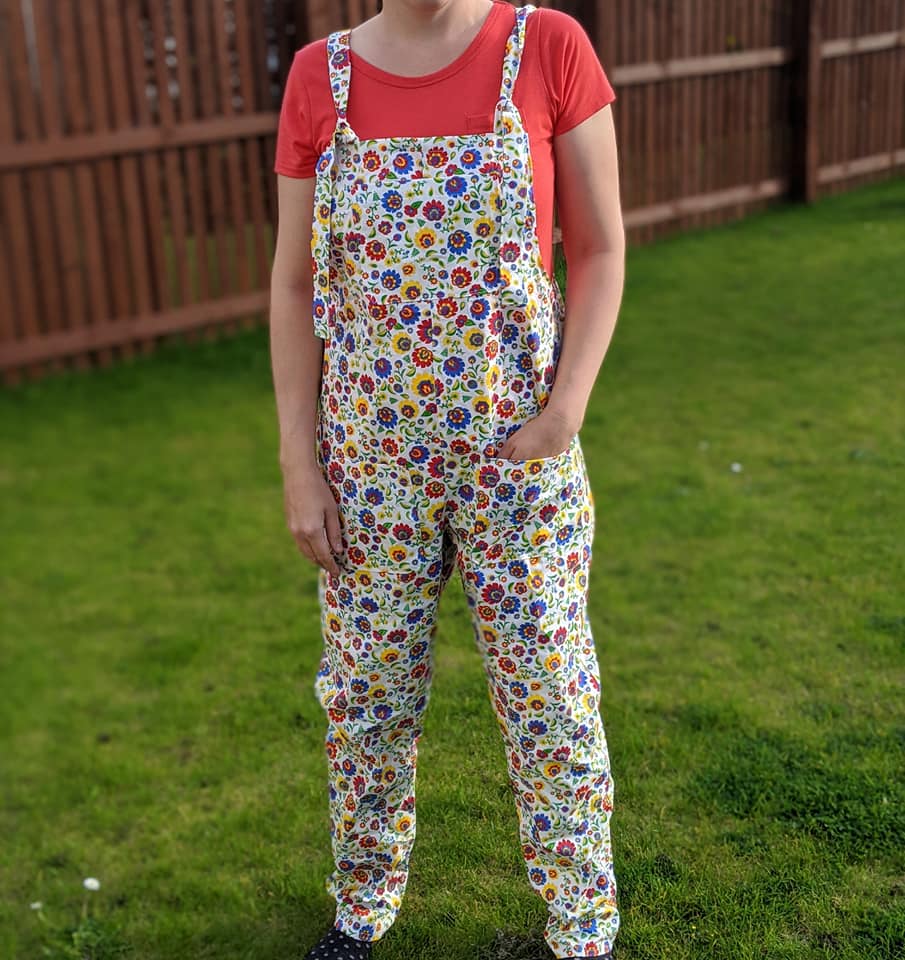
After this, I told myself that I really didn’t need any more dungarees now. I had a variety of pairs in different colours and prints, and that was quite enough. However, I discovered the most gorgeous fabric on Flamingo Fabrics website. It’s a folk print of flowers in vibrant colours on a white background, and it’s cotton twill. I loved the fabric, it was really cheap, but it couldn’t be made into anything other than dungarees as it wasn’t drapey at all. So Heydays pair number five were born! These feel a little stiff, but the fabric has been softening with washing and wearing.

Of course the problem now is that almost all my dungarees are in printed fabrics, as are my t-shirts. So theoretically, I now have to buy some gorgeous jewel toned needlecords and deep blue denims, and make myself some more pairs in plain fabric. In fact, I already have a pair cut out in some brownish green cord! The designer has also just released a kids’ version of the pattern, and my toddler has requested red tartan dungarees to match mine. Yes, I may be slightly addicted…

Advertisement
Uncategorised

Hello again!

Well, it’s been rather a long time since I wrote anything on here!

Last time I blogged, I was thinking about creating a handmade wardrobe. I had a small baby, was going to sewing classes, and enjoying a nice relaxed maternity leave. Now I have another small baby, I’m obsessed with sewing, and I’m having a very different maternity leave experience in a pandemic!

Knitting and crochet will always be my first loves, but sewing has really taken over for me at the moment. It’s rather satisfying to complete a garment in an evening. I recently invested in an overlocker, which has been a lot of fun and increased productivity quite dramatically. I’m still designing when I get time, most recently having a mitten pattern published by Knotions. I’m also still selling my handmade items at The Leith Collective, and occasionally working in the shop.

Recently I’ve been posting a lot on Instagram, as a way to document my makes. I also love searching hashtags to find out what other people have been sewing and get inspiration. Lockdown has started a whole new community of crafters – it’s so great to see people making, baking, growing and creating!

Uncategorised

Sewing Bug

I made a New Year’s resolution to sew a wardrobe for my baby. Instead, I’ve gone a bit sew obsessed, and have made just about everything apart from a baby wardrobe! I did make a pair of corduroy trousers, and also some bibs, but I’ve been distracted by other things.

I’ve been doing “sew with your baby” classes at Red Thread Studio, which are just brilliant. It’s two hours a week of protected sewing time, while your baby gets to play in the corner. Well, your baby is meant to play in the corner, but mine likes to “help” me, which can be interesting. The course is great for someone like me though, as I’m prone to rushing things in the interest of a quick result. Our tutor makes us slow down and do things like tacking and pinning and pressing, and I’m feeling that my skills have definitely improved. One particularly good thing about the course is that I’ve learnt how to sew with jersey, making t shirts and baby leggings.

The first class of the course was last year, and we started out with simple tote bags. I created one for my mum out of some old curtains from her house, in a vintage fabric with really cute mushrooms on it.

IMG_20181106_165941_833

Then I made another one for my friend with lining and an applique hand-embroidered design, which was a little more complex.

Screenshot_20190207-231537

The baby leggings were next. I made them using the pattern we were given first of all, but preferred a slightly more fitted style with a central crotch seam. Without another pattern to use, I drew round a pair of existing leggings and made a pattern to fit by trial and error. This resulted in four different pairs of leggings in various fabrics, mostly found at the Borders Scrapstore.


We also learned how to insert zips, so I used two fat quarters to create a little zipped pouch for my sewing stuff.

IMG_20181127_151326_594

The next course started a few weeks ago, and we started making clothes for ourselves. First up were some pyjama trousers. I was a bit sceptical about making trousers, as I was worried about the fit and comfort. I couldn’t have been more pleasantly surprised, as these trousers are so comfortable that I didn’t want to take them off! They were sewn from some flowered cotton that I found in a second hand shop, and worked up really quickly.

dav

Next, we started on a more complicated jersey project – a t-shirt to fit an adult. My first one was made in second hand jersey, and I followed the pattern exactly to make a fitted design with three quarter length sleeves. Having had three children and eating a moderate amount of cake, the fitted design wasn’t really for me. I also have a freakishly long body, so could have made it a bit longer. I found a metre of the most amazing unicorn fabric in Remnant Kings, so cut out another t-shirt with no shaping in the body and a bit of extra length.

In between classes, I decided to make a few things myself at home. First up was a Clemence skirt from Tilly and the Buttons. This is a super easy skirt which is made by measuring yourself and cutting pattern pieces to fit. It has French seams and a concealed zip, and can be made with pockets in the seams if you like. I made mine in some amazing swan print cotton from the John Lewis sale, and I’m super happy with it. It will be ideal for ceilidh dancing.

IMG_20190112_215639_785

Next, I made a Lilou dress for a family party. This was supposed to have a pleated skirt, but I changed it to have a Clemence skirt attached to the bodice pieces instead. The fabric was from a duvet cover that I picked up in a charity shop, which had been waiting for the perfect project. I added some length to the bodice, but ended up with a lot of extra fabric in the back. Luckily, my tutor at Red Thread was able to give me some guidance about adding darts, and it’s now a super comfy and well fitting dress!

IMG_20190119_153831_554

Of course my daughter wanted her own skirt once she’d seen mine, so I made her a Clemence skirt next. This was sewn from a remnant of cotton fabric with a Siamese cat print, using a Hobbycraft fat quarter to add a contrast waistband and applied patch pockets. She looks so lovely in it, and has added a dress to her wish list.

IMG_20190126_144102_621

I’ve also been doing an evening class at Edinburgh College in fashion and textiles, and have been learning how to do lots more things properly. I had my first shot on an overlocker, which was highly exciting, and have been discovering how satisfying it is to do top stitching on calico in beautiful straight lines!

IMG_20190131_203946_746

I now have a huge pile of fabric and patterns ready to be sewn, so although I might not have managed to make many baby clothes yet, I’ve definitely been productive! Sewing Bee comes back next week, so I don’t think this sewing bug is going to go away any time soon.

Uncategorised

New Year

It’s a new year, and traditionally the time to make resolutions, but I couldn’t think of anything apart from the usual “eat less cake and tidy up more” sort of thing. 2018 has been a pretty busy year – I almost finished uni, had a baby, started selling my work online and in store at The Leith Collective, published 8 patterns, and did a whole lot of other stuff as well. I thought – “maybe in 2019 I won’t set any goals, I’ll just go with the flow and have a chilled out year”. Well, we’re six days in and I’ve already been tempted by a few challenges – not resolutions as such, but just things I’d like to try.

First of all, I logged in to Ravelry. Ravelry told me that I’d knitted and crocheted 94 items in 2018. These weren’t all big things – for example, 15 of them were sets of crochet baubles, and there were lots of baby items in there too. But that got me thinking, could I make 100 items in 2019? Ravelry now has a project challenge feature where you can set yourself a goal for the year, so I decided to aim for 100 and hope that I don’t end up with RSI by the summer. Unfinished projects from 2018 will count towards the total, so I already have a head start.

dav

Part of the reason for setting this goal was that Ravelry also told me I have 14,809 metres of yarn in my stash. That sounds like a lot, doesn’t it? Unfortunately it doesn’t tell the full story – I have yarn waiting for several sweaters, a couple of bags worth earmarked for designs, and a whole pile that’s for knitting items for my shop. Oh, and the enormous scrap bag.  None of this is counted in the total. So, goal number two. I’m going to aim to knit 10,000 metres over the course of the next year. Apparently, my projects for 2018 used up over 15,000 metres of yarn, so this is a perfectly reasonable goal. The main problem will be that the Edinburgh Yarn Festival is in March, and I don’t have much willpower when it comes to resisting yarn. Part of goal number two, then, is that I’m not going to buy any yarn until March. Even if it’s in a charity shop and it’s super cheap and really pretty – this one will be a challenge!

Goal number three is a big one, and something that I’ve been thinking about for a while. I’ve blogged before about wanting to support small and independent brands, and to shop locally and handmade wherever possible. I also buy a lot of second hand stuff. I love trawling round charity shops, and very rarely get myself any new clothes. Ruth McGilp has been writing some excellent blogs about the ethics of the fashion industry recently, and really making the case for living sustainably. Recently she shared an article from Sophie Davies, who is challenging herself to buy all non-essential items second hand for a year. I liked the idea of this challenge, but wanted to add an extra element to it. Since I love making things, I’ve decided that my big challenge for 2019 will be to make my baby’s wardrobe. I already buy most of her things second hand, and I’m really lucky to have been given some beautiful clothes as presents for her. However, from now on, I’m not going to buy anything else. I can knit socks, jumpers, and cardigans. I’ve just had my sewing machine fixed, and with the help of the classes I did at Red Thread Studio and a great book I got in a sale today, I should be able to make trousers, t shirts, dungarees, dresses and so on. I’ll be using mostly fabrics from my stash, and if there’s anything else I need then I’ll look in charity shops and scrap stores for it. It will be a lot of work, but it will also be really satisfying I think. If all goes well, I might do the same for myself and the older kids next year!

img_20190106_190936.jpg

If you fancy taking up the handmade challenge or shopping sustainably for yourself, I’ve found some great blog posts which might give you some ideas –

Sustainably sewing your me-made wardrobe

Sustainable sewing blog series

My green closet

Uncategorised

Cinnamon Hat

It’s almost Christmas, so it’s the time for last minute gift knitting! If you’re making something in a hurry you want it to be simple yet effective, and I hope this hat fits the bill. It’s knitted in soft chunky yarn with a wool content, making it super warm, but you could substitute any standard chunky from your stash. You need approximately 125m (136yds) of yarn. The hat is knitted in the round on circular needles, and fits a standard sized adult head. It features a simple cable pattern, and is topped with an optional pompom. The folded brim makes it very cosy.

bty

The pattern is available for free, but if you’re not a knitter then I have a few of these hats for sale at The Leith Collective. If you knit this, please upload your projects to Ravelry or tag them on Instagram #cinnamonhat – it’s always so great to see what people have made!


Cinnamon Hat

Size – to fit average adult head of 56cm, finished unstretched circumference is 51cm

You will need –

1 ball of Hayfield Chunky with Wool, 80% acrylic/20% wool, 145m (158yds) per 100g ball. 6mm circular needle (40cm, or larger for magic loop) and 6mm DPNs for top of hat. Yarn needle for sewing in ends. Cable needle. Pompom.

Gauge – 14sts to 10cm (4in) in stocking stitch on 6mm needles.

Special Abbreviations –

C3R – hold next 3sts at back of work on cable needle, k3, then k3 from cable needle.

C2R – hold next 2sts at back of work on cable needle, k2, then k2 from cable needle.

Instructions

Cast on 72 sts on 6mm needles, join to work in rnd.

Work 28 rnds K2 P2 rib, starting K2.

Patt rnd: *K6, p6, rep from * to end of rnd.

Rep this last rnd three more times.

Cable rnd: *C3R, p6, rep from * to end of rnd.

Work patt rnd five times.

Rep these last six rnds once more.

Dec for top of hat:

Rnd 1: *C3R, p2tog, p4, rep from * to end of rnd. 66sts.

Rnd 2: *K6, p5, rep from * to end of rnd.

Rnd 3: *K6, p2tog, p3, rep from * to end of rnd. 60sts.

Rnd 4: *K6, p4, rep from * to end of rnd.

Rnd 5: *K6, p2tog, p2, rep from * to end of rnd. 54sts.

Rnd 6: *K6, p3, rep from * to end of rnd.

Rnd 7: *C3R, p2tog, p1, rep from * to end of rnd. 48sts.

Rnd 8: *K6, p2, rep from * to end of rnd.

Rnd 9: *K6, p2tog, rep from * to end of rnd. 42sts.

Rnd 10: *K6, p1, rep from * to end of rnd.

Rnd 11: *K2, k2tog, k2, p1, rep from * to end of rnd. 36sts.

Rnd 12: *K1, k2tog, k2, p1, rep from * to end of rnd. 30sts.

Rnd 13: *C2R, p1, rep from * to end of rnd.

Rnd 14: *K4, p1, rep from * to end of rnd.

Rnd 15: *K2tog twice, p1, rep from * to end of rnd. 18sts.

Rnd 16: K2tog to end of rnd. 9sts.

Draw yarn through rem sts and fasten off. Attach a pompom if desired.

IMG_20181216_101703.jpg